|
Cut out the Lid Listen Up!This is the most important cut of the whole process because it will be the most visible. GO SLOW - NO SECOND CHANCES!!! |
|
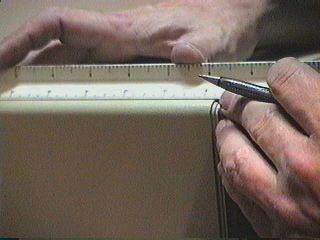
| Our cut will follow the red lines in the picture
to the right (move your thumb first).
|
|
| Use a ruler and a pencil to darken the seam line
along each side. Draw a line about half way between the vents and rear edge
along the back. Draw the line at the same width down through the handle
depression.
|
|
|
Cut a shallow bit at a time along the line. Push the tool against the direction of rotation (keeps the cut from filling in with melted plastic). If you see smoke, you're going too fast! Let the wheel (and the cut) cool for a few seconds and resume cutting. It will take several passes to cut all the way through.
|
|
| Cut along the back line next.
|
|
| I cut straight across the handle and don't try
to cut on the line yet. After the lid is removed, you can go back and trim
the handle hole on the case.
|
|
|
There are a pair of braces on the inside that served as guides for the analog board. You'll have to cut them from the inside before the top will come off. I use a small round metal cutting bit to cut through these structures. |
|
| And off comes the lid...
|