|
Taking it apart (continued)...
|
|
|
Remove the screws holding the analog board to the frame. Not pictured - one or sometimes two more screws along the front of the analog board. |
|
|
Lift the analog board out of the frame. Mac SE & SE/30's have a large power supply screwed to the analog board and located partially under the frame. You'll have to pull back on the logic board frame to get it clear. Mac Classics are similar to Mac SE's.
|
|
|
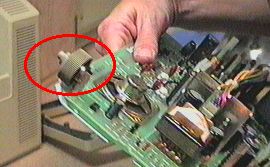
Pull the brightness knob (not present on Classics) off the analog board and set it aside. We'll put it back on later. |
|
|
Remove the floppy cable from the logic board. For Mac SE & Classic models there may be two floppy cables and/or a hard drive cable. Mac SE & SE/30's may have an expansion card installed. It's located on the opposite side of the logic board from the analog board and must be removed before removing the logic board. Mac Classics may have a RAM card installed on the right side of the logic board. Remove the two plastic clips and pull it up and out. |
|
|
Remove four Torx screws - one at each corner of the CRTand lift the CRT out of the case. Note: Two screws on the opposite side of the CRT are not pictured. If you plan to throw the CRT away, you should release the vacuum from the tube. Put the neck of the CRT in a box and hold it so the box is between you and the tip of the tube. Reach in and break off the tip with a pair of pliers. You should hear a "hissss" that lasts for several seconds. |
|
|
Pull the logic board out of the frame. An unmodified Mac 128/512/Plus board pulls straight out. A board with an accellerator or other upgrade installed is removed by prying one guide rail aside and releasing the board. Mac SE/SE30 boards pull up until notches in the board match tabs in one side of the frame and then outward. Remove the speaker wire after freeing the board. The Mac Classic board is about half the size and pulls straight up and out. |
|
| Remove two Torx screws holding the bottom of
the frame to the bezel.
|
|
| Remove three Torx screws holding the top of the
frame and lift the frame assembly from the bezel.
|
|
|
Congratulations! You've just field-striped a Mac. Now comes the hard part... |